Arcade-Dual-Stick
Custom Dual Arcade Stick Box
A custom Dual Stick using home-made fabricated box & two Zero Delay Controller boards.
Use on games that have two joysticks to control your movement and directional fire like Robotron: 2084.
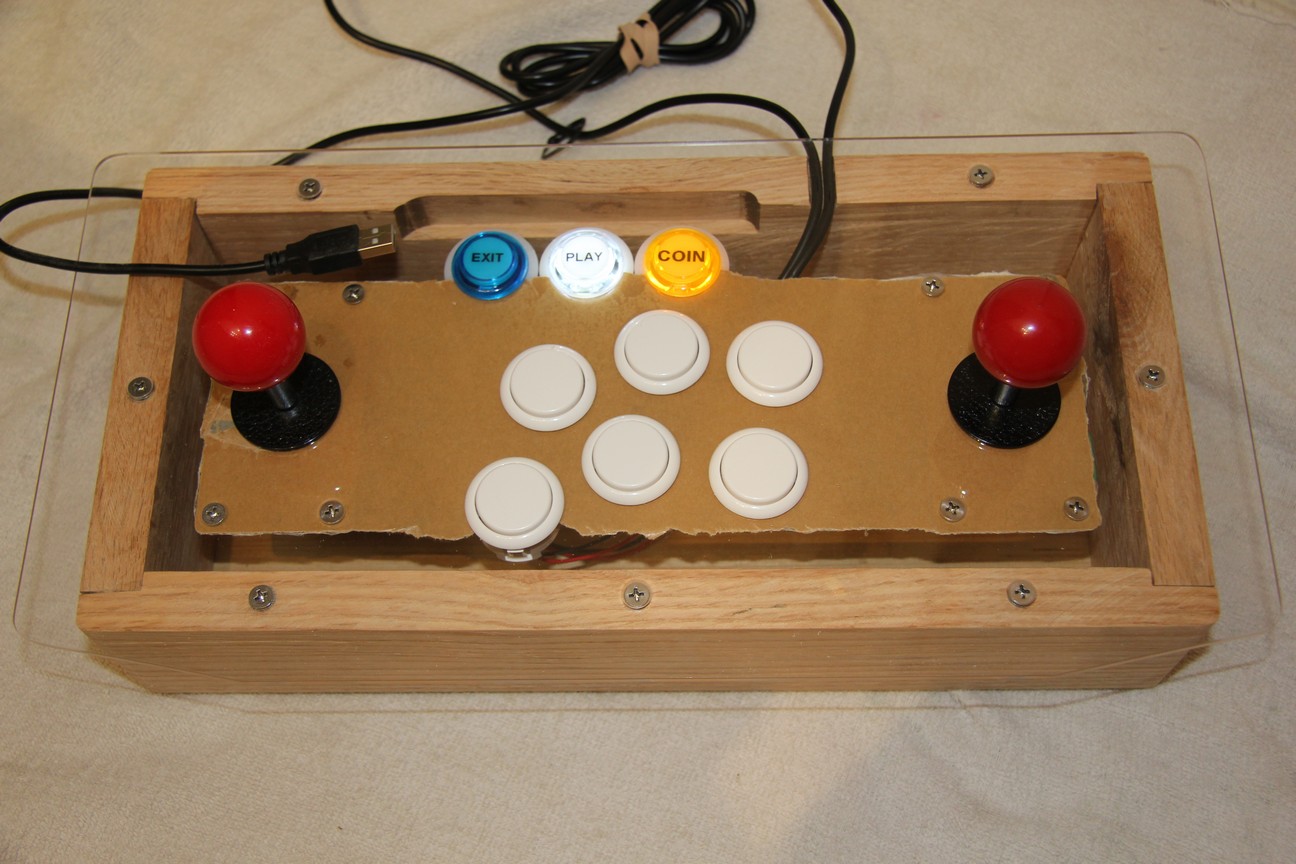
The first Zero Delay Controller is setup in box attached to left Joystick and can be used as player #1 with
Buttons 1-6(turned CW ‘S-pattern’), plus 9-Select(Coin), 10-Start(Play), and 12-Hotkey(Exit).
The second Zero Delay Controller is setup in box attached to right Joystick without any additional buttons.
In Robotron: 2084 control is handled by both Joysticks with use of Coin & Play buttons.
First Zero Delay Controller
| Plug | Button | Use |
|---|---|---|
| K1 | Button 1 - X | X |
| K2 | Button 2 - A | A |
| K3 | Button 3 - B | B |
| K4 | Button 4 - Y | Y |
| K5 | Button 5 - L | L |
| K6 | Button 6 - R | R |
| K9 | Button 9 - Select | Coin |
| K10 | Button 10 - Start | Play |
| K12 | Button 12 - Hotkey | Exit |
| Joy | 5 Pin SANWA | Joystick 1 |
Second Zero Delay Controller
| Plug | Button | Use |
|---|---|---|
| K1 | Empty | Unused |
| … | Empty | - - - |
| K12 | Empty | Unused |
| Joy | 5 Pin SANWA | Joystick 2 |
Second Joystick 5 Pin to Controller Plug
If you rotate a Sanwa or Seimitsu joystick with micro-switches soldered to a PCB board, the wire harness will not relay proper connection order for expected four directions. The first row below is the standard mounting of 5 pin joysticks with connector exiting lower right corner. There are another three possible orientations to mount such a joystick. My stick two has the harness exit from upper left to aid fitting into the wood box. The result is left/right and up/down directions being flipped on the harness, requiring adjustment to a single end. Four direction connections other than the Ground are released from plug and re-inserted in new proper location. The modification re-orients the joystick back to proper four directions. The process is required to stop Binding confusion when using similar controller boards with RetroPie/RetroArch. A similar issue can happen to buttons if you don’t follow a consistent button assignment order.
Sanwa/Seimitsu Harness Layout-viewed from top
| Pin Direction | Pin# Change | Orientation of plug |
|---|---|---|
| Gnd ◄ ► ▼ ▲ | G 2 3 4 5 | Lower Right (Std) |
| Gnd ▲ ▼ ◄ ► | G 5 4 2 3 | Bottom Left |
| Gnd ► ◄ ▲ ▼ | G 3 2 5 4 | Upper Left |
| Gnd ▼ ▲ ► ◄ | G 4 5 3 2 | Top Right |
Coin, Play & Special Buttons wiring
Partial Game list of dual joystick controls
Angel Kids, Assualt, Black Widow, Bullet, Crazy Climber 2, Draco, Karate Champ, Krull, Libble Rabble, Munch Mobile, QB-3, Robotron: 2084, Rock Climber, Screw Loose, Smash T.V., Space Dungeon, Splat!, Title Fight, Total Carnage, etc.
Robotron: 2084 and Smash T.V. Second Controller setup
The Box: Dual Stick box dimensions
Wood box measures 14½” x 7” x 3” in size, ¾” thick walls -
wood sides (top/bottom) have ¼” deep rabbet ¾” wide butt joints glued, and undersized ¼” rabbet along inside bottom edge to allow 13½” x 6” x ¼” plywood panel to recess in flush. The wood box outside bottom and side edges have ¼ round routered edge.
Plexiglass top measures 16” x 8” x ⅛” with ¾” overhang each side, except ¼” in rear - box sides cut oversized however, allows for larger stable footprint. (original reason for wood recess near Exit/Play/Coin buttons)
Top attached using seven M4x12mm flat head Phillips screws and M4*8mm threaded wood inserts. Bottom attched with twelve #4 x 1” flat head wood screws every 2-4” apart.
Each joystick attached with four M4x12mm flat head Phillips screws and M4 serrated flange nuts.
Final clear coat finish will be applied, a printed insert covering controller & wire clutter to complete project.