How I Changed my Pro Micro Fuse bits
Pick an AVR Programmer
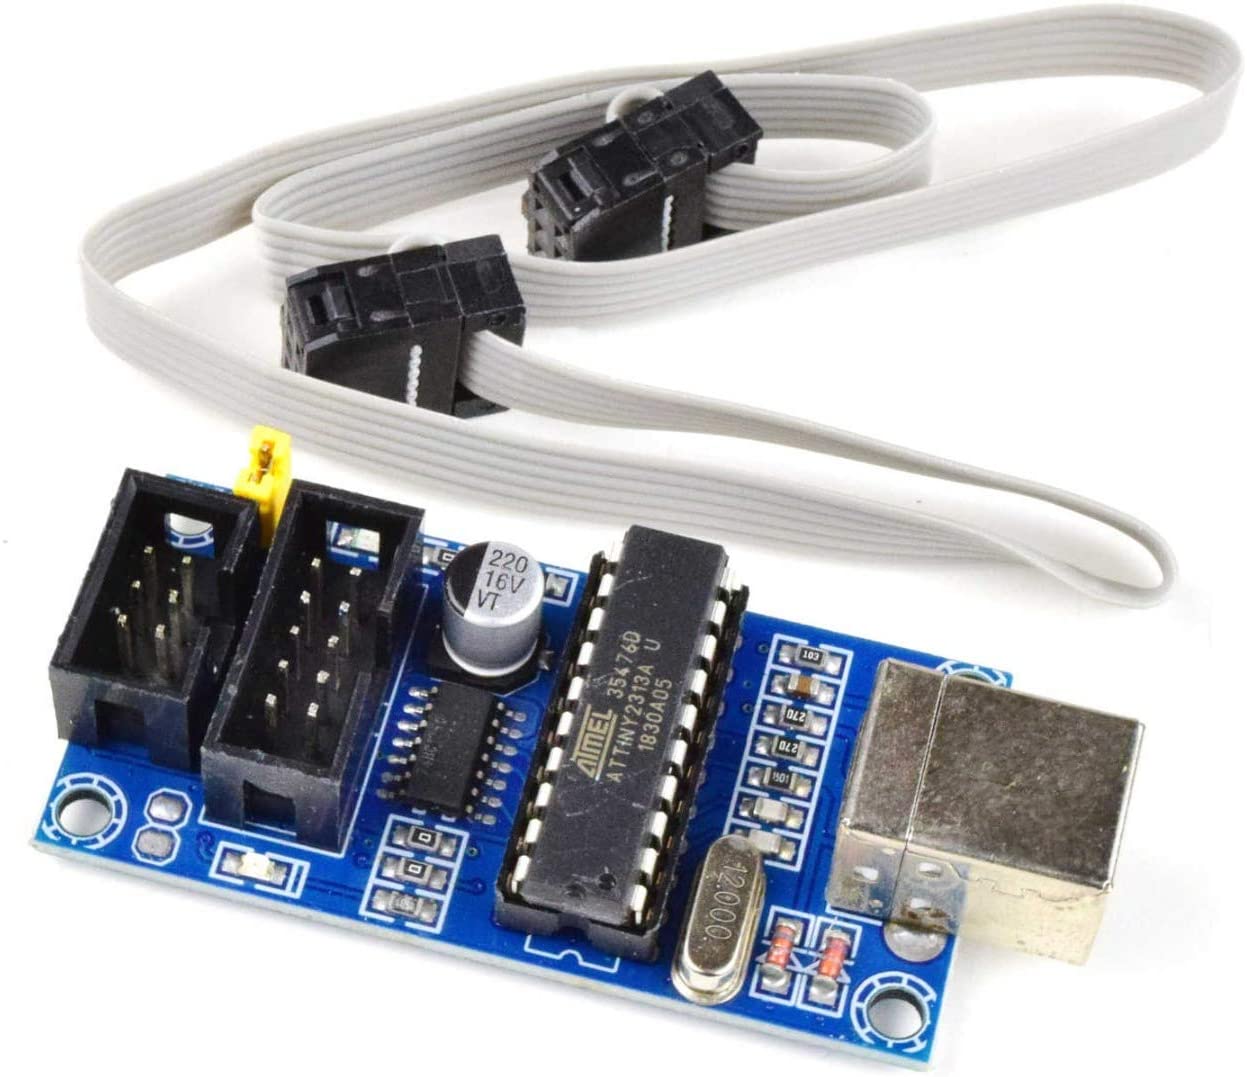
I used an USBtinyISP Programmer with a custom wire harness to connect a Pro Micro.
Harness is a single 3x2 Female JST connector wired into a dual 4x1 Female JST connector, or
ICSP (In Circuit Serial Programming) 6-Pin Cable coverted to Arduino Pro Micro headers.
See here
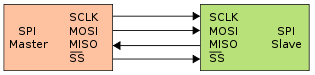
via SPI (Serial Peripheral Interface) pins SCLK, MOSI, MISO, SS (Pro Micro holds low)
| 32u4 Pin |
Data | wire | USBtiny Row/Col |
|---|---|---|---|
| 10 | D10 | empty | - - - |
| 16 | MOSI | Yellow | 1 / 2 |
| 14 | MISO | Green | 2 / 3 |
| 15 | SCK | Blue | 2 / 2 |
| #21 | Vcc | Red | 1 / 3 |
| #22 | RST | Blue | 2 / 1 |
| #23 | Gnd | Black | 1 / 1 |
| #24 | Raw | empty | - - - |
On your computer,
Download and install AVRDUDESS - GUI version of AVRDUDE.
Download and install USBtinyISP drivers - follow link to GitHub.
Download and install Notepad++ to edit XML file ‘C:\Program Files (x86)\AVRDUDESS\bits.xml’ or any other software to edit XML files.
If you use Arduino IDE, I believe that includes a copy of AVRDUDE within the install package.
Before starting AVRDUDESS,
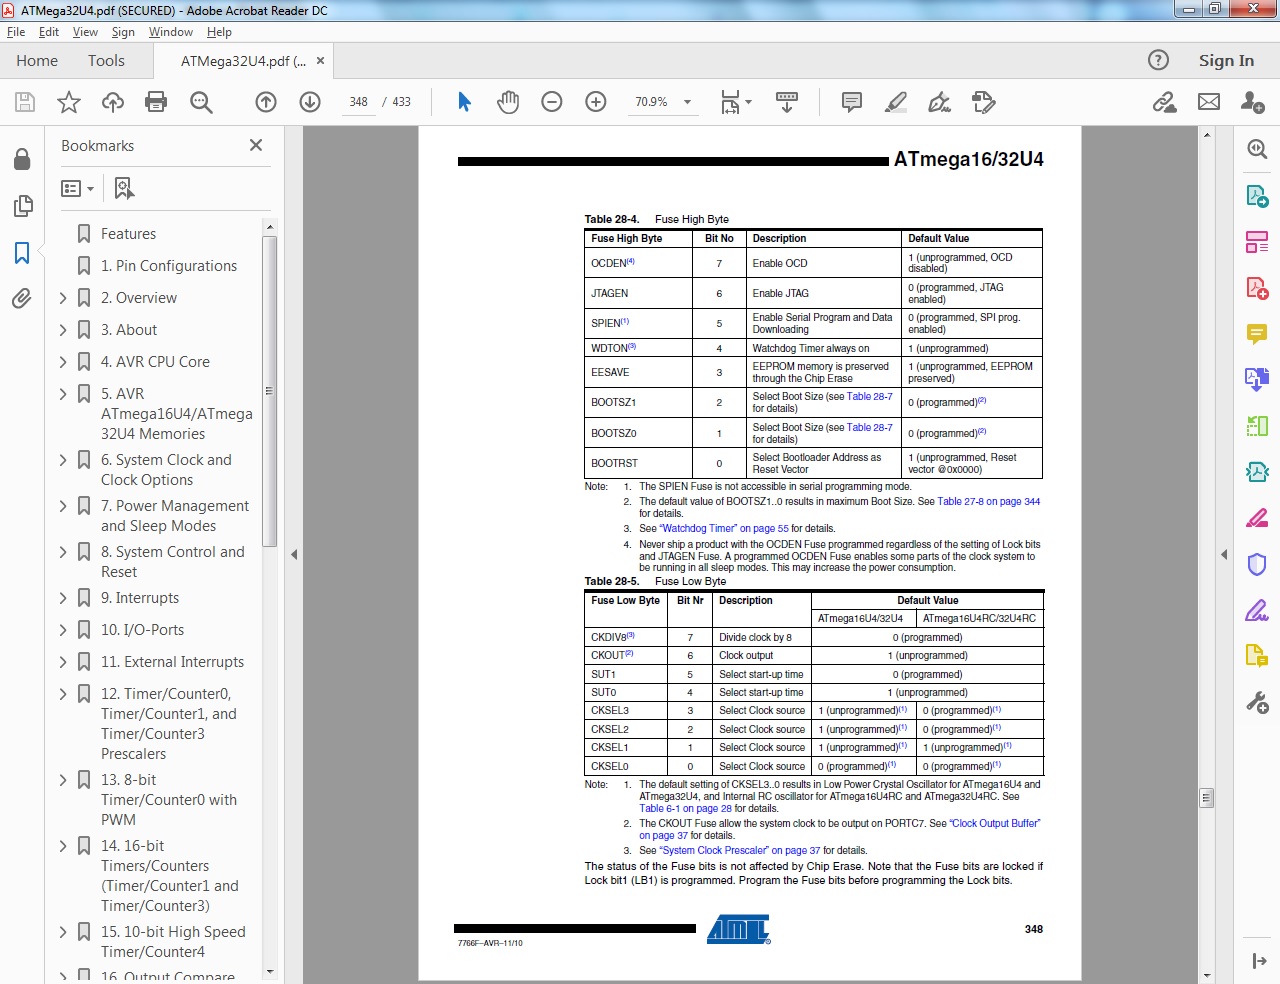
you will need to add XML ‘mcu’ tag group including attributes for your ATMega32U4 MCU.
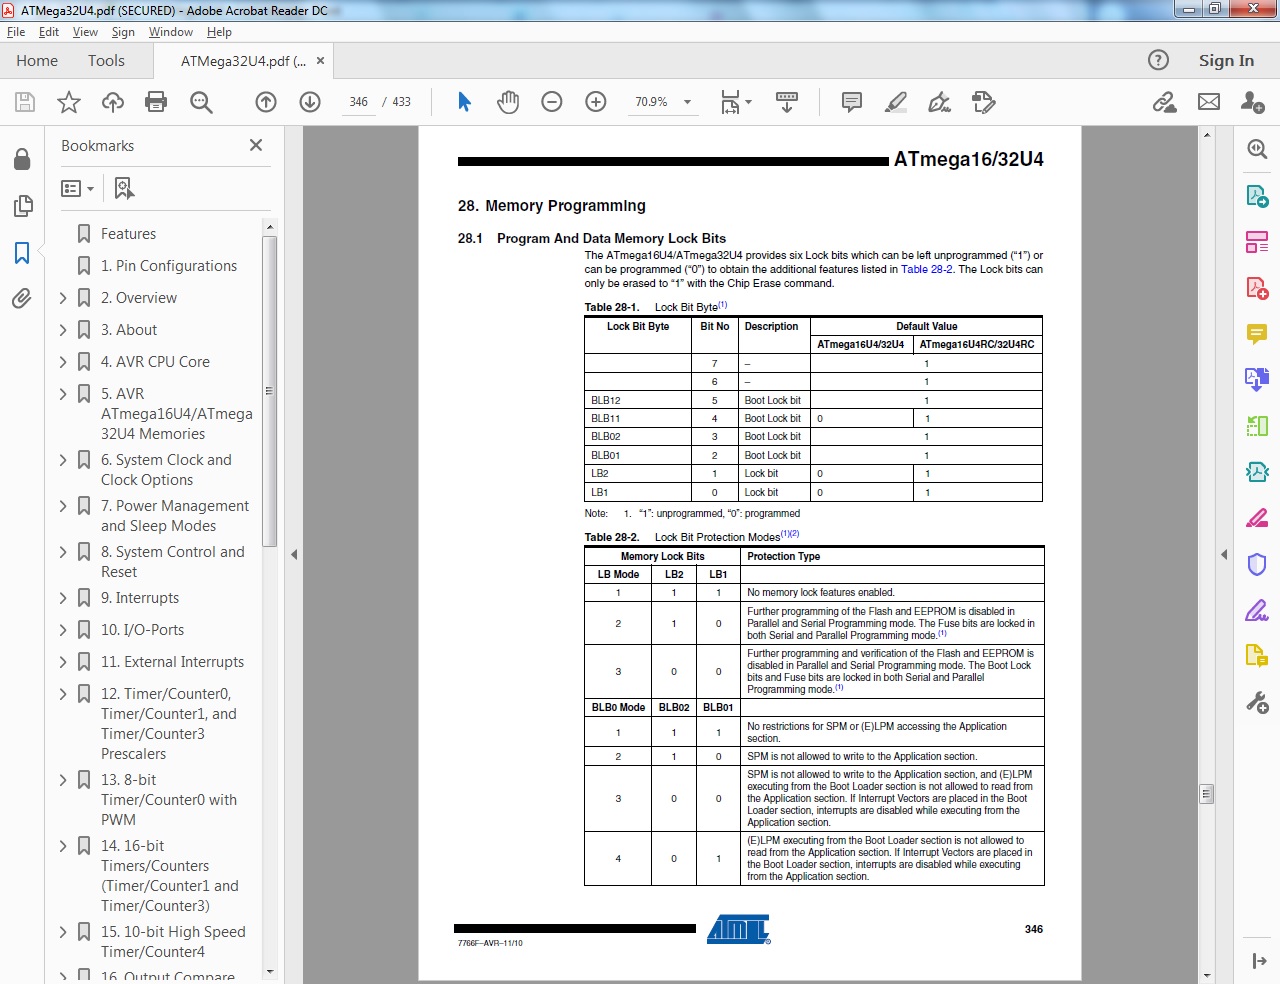
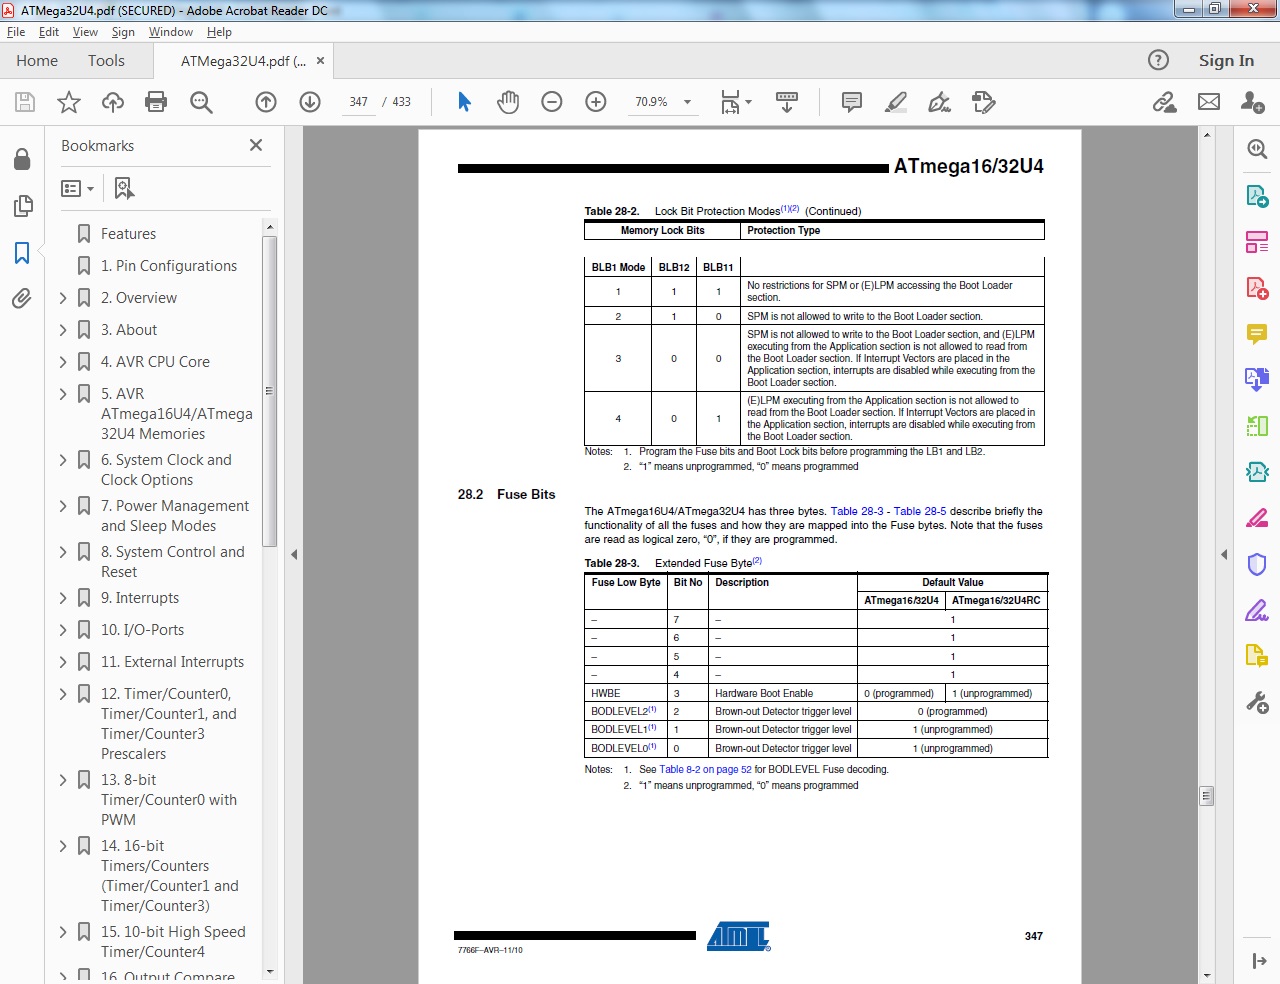
Attributes for High/Low/Extended & Lock bits can be found in the three manual pages listed below
ATmel manual for ATMega32U4 pages: 346 - 348
Lock bits,
Extended bits,
High/Low bits
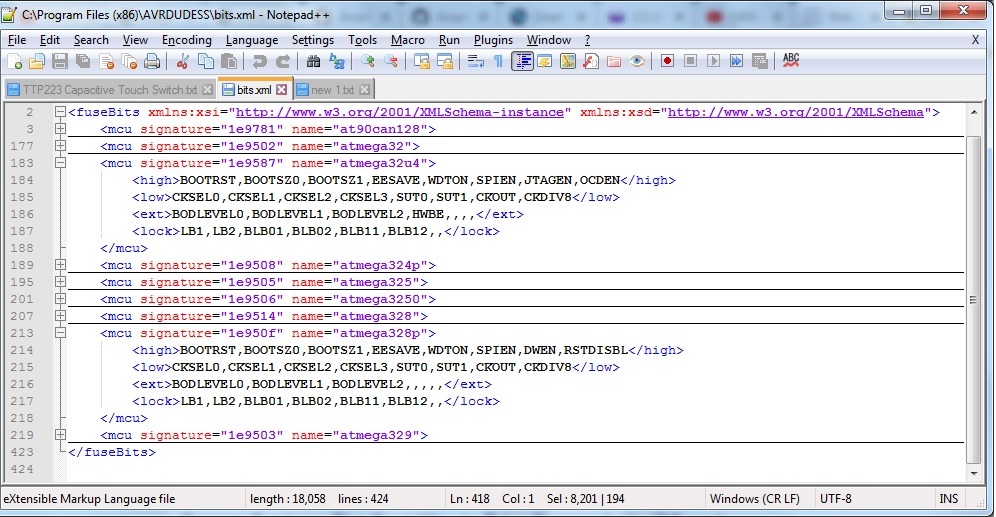
Start Notepad++ and load XML file ‘C:\Program Files (x86)\AVRDUDESS\bits.xml’.
You can collaspse (Alt+2) & uncollaspse (Alt+Shift+2) extra ‘mcu’ tags.
(Keep ‘atmega32’ & ‘atmega328p’ visible.)
Copy and paste ‘atmega328p’ XML ‘mcu’ tag group (6 lines)
insert after ‘atmega32’ and change name to ‘atmega32u4’.
Note: ‘Bit No’, and ‘Bit Byte name’ from ATmel pages; as you will need to change or add a few ‘Bit Byte names’.
When finished should look like AVRDUDESS - Configure ‘bits.xml’
Save your updated bits.xml file.
Your MCU ‘signature’ can be verified by starting AVRDUDESS with
Programmer: USBtiny ladyada version
Port: USB
Connect your Pro Micro to your custom wired harness(dual connectors side).
Confirm and connect to the ICSP header(6-pin side) on your USBtinyISP.
Connect the USB A/B cable.
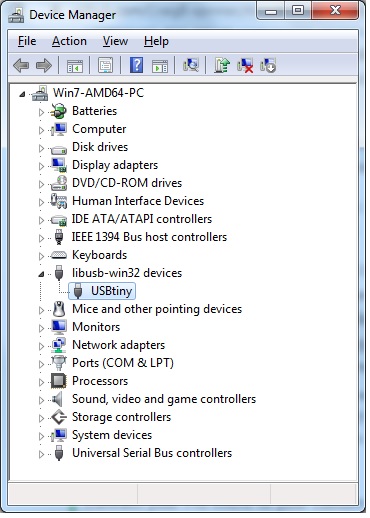
Your computer should find your AVR programmer.
You may need to check Start, Control Panel, System, Device Manager for any device driver issues.
USBtiny-Device Manager
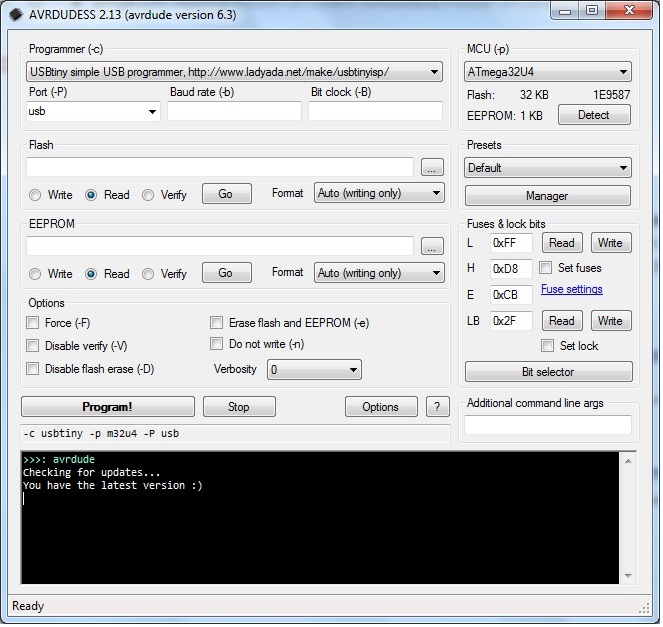
If everything is Okay, Start AVRDUDESS,
configure: Programmer & Port
Select your MCU from drop-down list
click on Detect - Your MCU/signature should respond.
Update bits.xml with your MCU signature.
Update bits.xml with any differences or missing Bit names
under high, low, ext, lock tags. (8 Bit names per Byte, some are blank).
Restart AVRDUDESS
configure: Programmer & Port
Select your MCU from drop-down list
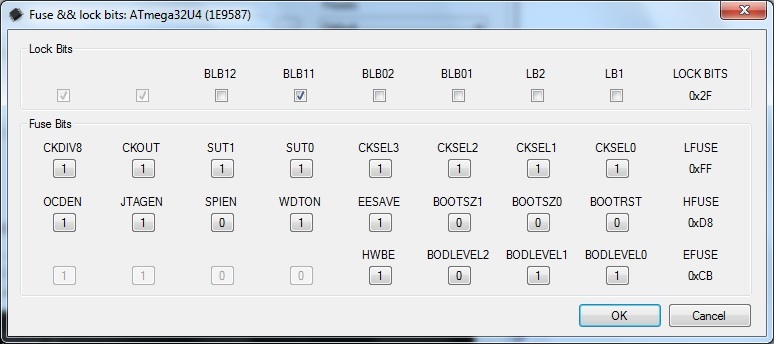
click on Read for both ‘Fuses & lock bits’
click on Manage and save a preset for your Pro Micro - also write down your defaults programmed into your micro-controller.
click on Bit selector it should now show the breakout of your ‘Fuse & Lock bits’
AVRDUDESS - Fuse & Lock bits
‘Fuse & Lock bits’ panel should allow changes to bits and recalculate the new byte value.
Use caution when reprograming Fuse bits (L-FF, H-D8, E-C8) & Bootloader,
as incorrect settings may brick your microcontroller.
I recommend only changing JTAGEN bit,
unless you are thoroughly read on the operation of your micro-controller chip.
Fuse bits are only changed when you do a physical write by click on Write
Proceed at own risk.
Good Luck - and May the Trackball Twinkle in Multiple Colours!
Oops - I bricked my Bootloader!
I did this by mistake when switching between Arduino Leonardo and Sparkfun Pro Micro 5V (defaults to 3.3V, first in list) clone Boards.
I tried to flash the bootloader from Arduino IDE under Tools, Programmer: “USBtinyISP” (my ISP or ASP used), Burn Bootloader; with no luck.
Windows does not recognize device as USB HID and LEDs do wierd flashing, no 2nd COM port registered in Arduino IDE.
Part Deux: Flash the NAND using AVRDUDESS direct.
Oh! where or where did Sparkfun hide Bootloader.hex! You find Leonardo;
where ask Raphael, Donatello, & Michelangelo - TMNT! - Arduino in a half shell!
- Use bootloaders -> download here
- Unzip folder - Remember…
- Start AVRDUDESS
- Under Flash, navigate to ‘C:\…\SparkFunBoard_Addons_Jan_16\sparkfun\avr\bootloaders\caterina\Caterina-promicro16.hex’
- Select Write
- Click
Go, to flash Caterina Pro Micro 16MHz bootloader.
Unplug your ISP cable harnesses (two 3 wire 4 pin plugs) and plug-in micro USB into Pro Micro, windows should plug-n-play board.
Test using Blinky_lights (adjust delays for secret hand-shake) using normal Upload icon.
Re-load new sketch (software) again!
FIXED!!!